
I'm thrilled to introduce Jen (who blogs at Quilter in the Closet) to share the final free motion quilting advice guest post. I 'met' Jen a long time ago, and am constantly inspired by her work. Jen actually pattern tested my Giant Chevron pattern last year, and the way she quilted hers has partly inspired this QAL. Thanks so much for such an excellent post, Jen!
Hi there! First, a big thank you to Jess for thinking of me when looking for a guest post. I still consider myself a novice at best, but I've learned a lot and I am happy to share what I've learned. Whole books have been written on the subject, so I just focused on a few things.
I really only started doing my own FMQ in 2012, when I found the Free Motion Quilting Challenge at Insights from SewCalGal. The FMQ challenge was fabulous! Each month a new expert in FMQ would provide a fresh lesson, and participants would give them a try. Some of the lessons are still available; click HERE to be directed to the links from SewCalGal, you might have to scroll down a little but they are worth it.
I can honestly say that just the act of practicing FMQ each month was the biggest boost to my skill. I don't think it matters what design you are attempting, just the act of practicing makes you better. Seriously the biggest challenge is just deciding to give it a try. Be fearless! What is the worst that can happen?
Practice Sandwiches
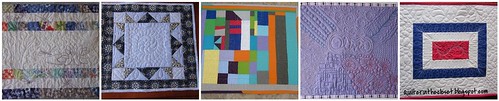
I know Pat has already mentioned practice sandwiches, but they are a big part of my preparation for quilting. When I was learning FMQ, I chose to make place mat sized sandwiches for the FMQ challenge. They were big enough to allow me time to figure out the lesson on fabric, but small enough to be easy to manage under the machine. They are also big enough to have something to hold on to while you are trying out a design, but not so big that you feel like you are wasting fabric if it all goes wrong. Plus, unless your cooking is truly terrible, no one will be studying your place mat in detail. Here are some of the place mats I created during the challenge.
I now use smaller practice sandwiches. My standard is a 10 x 10 black layer cake square, 2 layers of batting (because that is what I like to use in my quilts), and some scrap fabric on the back (a great use of questionable quality fabric that you got in a swap). Before I start stitching on any quilt, I pull out a practice sandwich and the thread I want to use on my quilt and start quilting. If the design I am going to use is small, I will stitch it on my practice sandwich. If it is large or complex, I might just stitch my favorite swirls to remind my muscles what to do, get my tension right, and figure out if today is a good day for quilting (some days I'm just plain too tired or distracted). If all is going well at the end of my practice sandwich, I will move on to my quilt.
Practice sandwiches also give you an opportunity (off quilt) to try out new designs or threads, and regulate your speed. Speed is something that will be different for everyone. Personally, I like to really pedal to the metal; however, it is not the speed that works best for me. If I quilt too fast, I tend to jerk the quilt around a bit, making large stitches in a sea of smaller stitches. If I quilt too slowly, all my stitches are super tiny. I found out through practice that somewhere between medium and high yields my best results.
I feel it is important to note that at some point you have to "just do it" and try your hands on a real quilt. Practice sandwiches are great, but there is nothing that will build your muscle memory like completing an entire quilt. You will notice a difference from the spot you start to the spot you finish. Don't stress though, it is still perfectly cuddle-able and you should be proud to give it as gift if that is what you intended the quilt for.
Threads and Needles
I mostly use Aurifil or Superior Threads for my quilting now. The path to those choices wasn't smooth. I was trying to finish a quilt up for charity using a simple meandering design and my gorgeous variegated Superior Thread that matched the quilt perfectly, kept breaking. I am not exaggerating when I say I could only stitch about 6 to 8 inches before the thread would break. I was at my wits end! I went through the list from the experts of what to try, and it was still breaking. I finally broke out a pack of Superior needles (that I was saving for some reason) and gave them a try. No more problem! Superior Threads even tells you on the bottom of their spools what size needle to use.
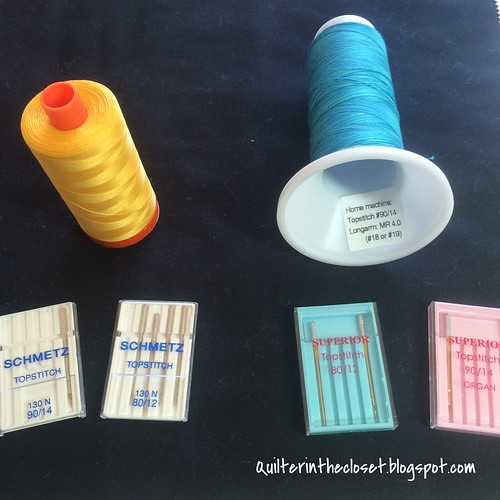
I had a similar problem with Aurifil threads. I had started using those Superior needles for all my quilting, and when I tried out Aurifil, it kept breaking. Again, I was at my wits end. Everyone raved about this thread, and I had bought a LOT of it. It pieced nicely, but maybe the stress of FMQ was too much?? On a whim, I switched back to the Schmetz needles I had. No more breakage. Go figure! It was only through trial and error that I figured that all out. -- on a side note, the Gutermann thread I started my quilting journey with years ago, never broke, regardless of the needle used.
I read recently that ball-point needles should be used for quilting. I haven't had the chance to try them out yet, but plan to. They might just be what works for you.
Tension
It can really be nerve-racking trying to get tension right. Use your practice sandwich to get an initial tension level, but check the underside of your quilt frequently AND any time you change a bobbin, re-thread your machine, change a needle, etc. I know you want to just get going and finish, but a few stitches is easy to rip out - a whole quilt full, not so much.
One of the biggest tips I can give someone new to FMQ is to use the same color thread in your top and bobbin. It won't solve every tension issue (eyelashing for example), but it will give you a slightly wider range of acceptable tension levels. For example, (usually)my machine likes to quilt on or around 3.5 for most quilts I make. If I have a different color thread on the bottom (maybe I wanted to blend with my backing), I will need to adjust my tension to find that sweet spot, almost exactly, otherwise you will see little dots of the wrong color either on the top or bottom of my quilt. Whereas, if I use the same color thread, I could have my tension set anywhere from 2.5 to 5, and you wouldn't see the difference! That's huge! Especially for someone just starting out.
Have a Game Plan for your Quilt
All I mean by this is, think about what design you are going to do, and where you need to start your stitching. If possible, your game plan should allow for the least amount of quilt in your throat space. You don't want to start on the left side of your quilt and have the entire thing bunched up in your throat space; it's not impossible, just uncomfortable.
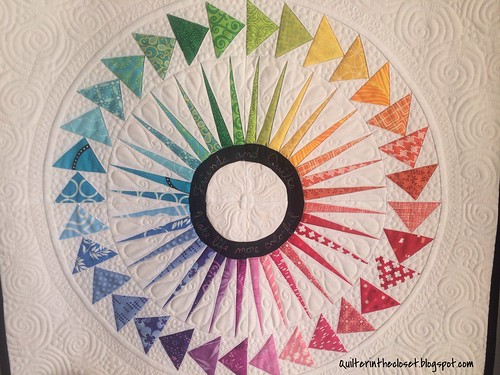
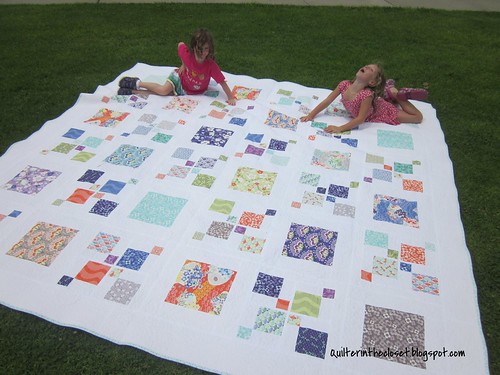
If you are going to do an all over pattern, or the same design in all the negative space in your quilt, I would probably start in the dead center of my quilt (in a seam so as to hide my starting stitches) and quilt the lower right quadrant of my quilt (pretend your quilt is divided in 4 quarters). I would then work my way, by quadrant around the quilt. This big quilt was quilted that way. I worked on 9 blocks at a time.
If my plan was to quilt each block differently, then I would probably start with the blocks near the center and work my way out.

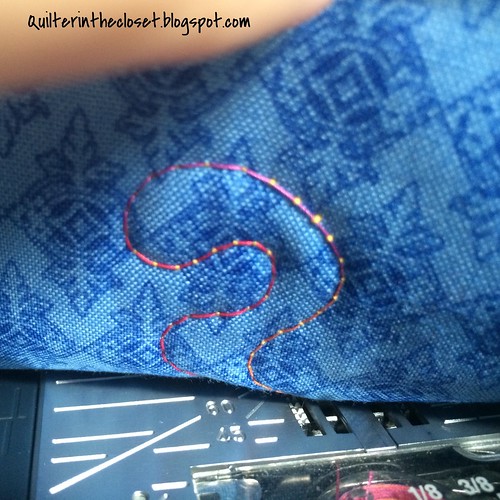
In the case of Jess's pattern. I started by quilting the center (red) stripe, turning my quilt when the chevron turned, and then worked my way out from the center by stripe.

I could also go on and on about the benefits of stitching all your seams in the ditch before you start FMQ, but THAT might be going too far for this guest post. (Experiment with it, just saying!)
So to recap my best FMQ tips:
Thanks again, Jess, for the invitation to share some tips. I look forward to seeing everyone's FMQ in this QAL.
Jen
Hi there! First, a big thank you to Jess for thinking of me when looking for a guest post. I still consider myself a novice at best, but I've learned a lot and I am happy to share what I've learned. Whole books have been written on the subject, so I just focused on a few things.
I really only started doing my own FMQ in 2012, when I found the Free Motion Quilting Challenge at Insights from SewCalGal. The FMQ challenge was fabulous! Each month a new expert in FMQ would provide a fresh lesson, and participants would give them a try. Some of the lessons are still available; click HERE to be directed to the links from SewCalGal, you might have to scroll down a little but they are worth it.
I can honestly say that just the act of practicing FMQ each month was the biggest boost to my skill. I don't think it matters what design you are attempting, just the act of practicing makes you better. Seriously the biggest challenge is just deciding to give it a try. Be fearless! What is the worst that can happen?
Practice Sandwiches
I know Pat has already mentioned practice sandwiches, but they are a big part of my preparation for quilting. When I was learning FMQ, I chose to make place mat sized sandwiches for the FMQ challenge. They were big enough to allow me time to figure out the lesson on fabric, but small enough to be easy to manage under the machine. They are also big enough to have something to hold on to while you are trying out a design, but not so big that you feel like you are wasting fabric if it all goes wrong. Plus, unless your cooking is truly terrible, no one will be studying your place mat in detail. Here are some of the place mats I created during the challenge.
I now use smaller practice sandwiches. My standard is a 10 x 10 black layer cake square, 2 layers of batting (because that is what I like to use in my quilts), and some scrap fabric on the back (a great use of questionable quality fabric that you got in a swap). Before I start stitching on any quilt, I pull out a practice sandwich and the thread I want to use on my quilt and start quilting. If the design I am going to use is small, I will stitch it on my practice sandwich. If it is large or complex, I might just stitch my favorite swirls to remind my muscles what to do, get my tension right, and figure out if today is a good day for quilting (some days I'm just plain too tired or distracted). If all is going well at the end of my practice sandwich, I will move on to my quilt.
Practice sandwiches also give you an opportunity (off quilt) to try out new designs or threads, and regulate your speed. Speed is something that will be different for everyone. Personally, I like to really pedal to the metal; however, it is not the speed that works best for me. If I quilt too fast, I tend to jerk the quilt around a bit, making large stitches in a sea of smaller stitches. If I quilt too slowly, all my stitches are super tiny. I found out through practice that somewhere between medium and high yields my best results.
I feel it is important to note that at some point you have to "just do it" and try your hands on a real quilt. Practice sandwiches are great, but there is nothing that will build your muscle memory like completing an entire quilt. You will notice a difference from the spot you start to the spot you finish. Don't stress though, it is still perfectly cuddle-able and you should be proud to give it as gift if that is what you intended the quilt for.
Threads and Needles
I mostly use Aurifil or Superior Threads for my quilting now. The path to those choices wasn't smooth. I was trying to finish a quilt up for charity using a simple meandering design and my gorgeous variegated Superior Thread that matched the quilt perfectly, kept breaking. I am not exaggerating when I say I could only stitch about 6 to 8 inches before the thread would break. I was at my wits end! I went through the list from the experts of what to try, and it was still breaking. I finally broke out a pack of Superior needles (that I was saving for some reason) and gave them a try. No more problem! Superior Threads even tells you on the bottom of their spools what size needle to use.
I had a similar problem with Aurifil threads. I had started using those Superior needles for all my quilting, and when I tried out Aurifil, it kept breaking. Again, I was at my wits end. Everyone raved about this thread, and I had bought a LOT of it. It pieced nicely, but maybe the stress of FMQ was too much?? On a whim, I switched back to the Schmetz needles I had. No more breakage. Go figure! It was only through trial and error that I figured that all out. -- on a side note, the Gutermann thread I started my quilting journey with years ago, never broke, regardless of the needle used.
I read recently that ball-point needles should be used for quilting. I haven't had the chance to try them out yet, but plan to. They might just be what works for you.
Tension
It can really be nerve-racking trying to get tension right. Use your practice sandwich to get an initial tension level, but check the underside of your quilt frequently AND any time you change a bobbin, re-thread your machine, change a needle, etc. I know you want to just get going and finish, but a few stitches is easy to rip out - a whole quilt full, not so much.
One of the biggest tips I can give someone new to FMQ is to use the same color thread in your top and bobbin. It won't solve every tension issue (eyelashing for example), but it will give you a slightly wider range of acceptable tension levels. For example, (usually)my machine likes to quilt on or around 3.5 for most quilts I make. If I have a different color thread on the bottom (maybe I wanted to blend with my backing), I will need to adjust my tension to find that sweet spot, almost exactly, otherwise you will see little dots of the wrong color either on the top or bottom of my quilt. Whereas, if I use the same color thread, I could have my tension set anywhere from 2.5 to 5, and you wouldn't see the difference! That's huge! Especially for someone just starting out.
Have a Game Plan for your Quilt
All I mean by this is, think about what design you are going to do, and where you need to start your stitching. If possible, your game plan should allow for the least amount of quilt in your throat space. You don't want to start on the left side of your quilt and have the entire thing bunched up in your throat space; it's not impossible, just uncomfortable.
If you are going to do an all over pattern, or the same design in all the negative space in your quilt, I would probably start in the dead center of my quilt (in a seam so as to hide my starting stitches) and quilt the lower right quadrant of my quilt (pretend your quilt is divided in 4 quarters). I would then work my way, by quadrant around the quilt. This big quilt was quilted that way. I worked on 9 blocks at a time.
If my plan was to quilt each block differently, then I would probably start with the blocks near the center and work my way out.
In the case of Jess's pattern. I started by quilting the center (red) stripe, turning my quilt when the chevron turned, and then worked my way out from the center by stripe.
I could also go on and on about the benefits of stitching all your seams in the ditch before you start FMQ, but THAT might be going too far for this guest post. (Experiment with it, just saying!)
So to recap my best FMQ tips:
- Just go for it and don't stress
- Practice - it takes time and practice to improve
- Match your top and bobbin thread
- Have a quilting plan
Thanks again, Jess, for the invitation to share some tips. I look forward to seeing everyone's FMQ in this QAL.
Jen
15 comments:
..........and you always amaze me with your beautiful quilting
Thank you so much for the great tips. One can never stop learning.
Another informative post! Thanks for sharing your expertise!
Great tips- a really useful series on FMQ. I attempted it for the first time this week and the results were not encouraging. However I shall try to practice regularly.
Another great FMQ post. What a great idea to practice on a useful object, like a placemat.
And thanks, Jess, for hosting. It's been really informative.
Hide starting stitches in a seam - genius! I fear I will never be an FMQ pro though, I just don't have time to do practice anything!
Thank you so much for these super FMQ tutorials! I have been aching to do this with no confidence since I don't have a big machine. I am going to give this a shot...thanks!
Do you have a pattern for the quilt with the 2 children sitting.
Love it.
@ Cat Stussi - the pattern is called Impromptu by Rachael Griffith. It was fun to make!
I am a new FMQer and am just eating up all this excellent advice. Great, informative, and inspirational post. Thank you so very, very much!
I have issues with Jen calling herself a novice! That flying geese / NYB / rainbow quilt at the beginning of this post is mine, yes really! Not in that I made it it, but in that Jen made it FOR ME and it hangs just outside my sewing room, and I look at it every day and it brightens my mood every time. Sorry gloat over, I just wanted to say Jen DOES know what she's talking about, her FMQ is awesome, as is her piecing, her fabric choices and her finishing, and, gosh darn it, just when we want to hate her, I have to tell you that she's a lovely person too!!!!
I love all of your tips, Jen, on FMQ and the way you shared your journey. I agree, it's time to come out of the closet! You do beautiful work. Thanks Jess for hosting this series. Really good stuff!
Julie @ The Crafty Quilter
Thanks for the tips. It's so hard to find the time to practice but it's true the more I do the better it gets!
WOW ! Great post, and could not have been more timely. I've never quilted anything and have now completed about 6 tops that I need to proceed with. I'll be sure to check back at this post as I work my way to an actual quilt top. I am afraid though, I can't afford to send my tops out, and I am rather a perfectionist. My practice placemat size pieces and sandwiches are not very promising at this time !!
omg Jen - I've just decided that Aurifil doesn't like my sewing machine but maybe its my needles - I use Superior needles for all my sewing !!! so glad I found this post - later is better than never right !! I'll give the Aurifil a go again with different needles - hopefully my breaking issue will be in the past :) x
Post a Comment